Thursday, May 23, 2019

What's New in SharePoint 2016

New Hybrid Possibilities with SharePoint 2016 and Office 365

No surprises here, though not the only focus of this new release, making SharePoint 2016 work with your Office 365 is a major part of it.

OneDrive Redirection

Though this has been available in SharePoint 2013 since SP1, with SharePoint 2016 you can redirect your My Sites to your Office 365 subscription’s OneDrive for Business host. In other words, if a user clicks on OneDrive, he'll be redirected to his Office 365 My Site and no longer to his On-Premises.

Sites you follow in one place

Now users can click on “Follow” both On-Premises and on their Office 365 and see them all in one place under the “Sites” app in the App Launcher.
The wizard to configure either of the simple scenarios above work very well, as long as you follow the requirements.
SharePoint 2016 Hybrid Team Sites

Hybrid Cloud Search

This is what a lot of us have been waiting for, a unified Search experience. Put simply, the Office 365 Search will take your On-Premises SharePoint Search Index so that it can give you results from both for the same query.
You should know that you'll have to use the Office 365 Search for this to work. If SharePoint 2016 On-Premises users query against their On-Premises Search service, it'll continue to only give them local results only.
However, once available, this will allow users to fully embrace Experiences like Delve in Office 365 and more to come in the future.

App Launcher and UI changes in SharePoint 2016

Our users couldn’t care less about the technology they have to use, and even less if they're in Office 365 or SharePoint 2016. That’s why it’s important to provide them with an (almost) identical interface to navigate both.
SharePoint 2016 introduces the App Launcher, as well as changes to the UI, to help it match the Office 365 experience.
App Launcher and UI changes in SharePoint 2016

SharePoint 2016 Infrastructure and Performance Improvements

“SharePoint 2016 was built from the Cloud-Up” – Bill Baer
Hybrid isn’t the only thing to get attention with SharePoint 2016, a lot of polishing has been done by Microsoft after having used the platform themselves with Office 365.

MinRoles

You can now install just the role that you want on particular SharePoint 2016 servers. This will only install what’s required there, but even better, it'll make sure that all servers that belong to each role are compliant. You’ll also be able to convert servers to run new roles if needed.
MinRoles in SharePoint 2016
Servers in Farm
You can even look at the services running on the SharePoint 2016 server and see if they are compliant as well.
Services on Server

Zero Downtime Patching

Now this will surely please many of you managing the SharePoint servers, the size and number of the packages are immensely reduced. They’ve also removed the downtime previously required to update SharePoint servers.

Removed 5,000 View Threshold – sort of

A Document Library can have 30,000,000 documents, that’s never been an issue. However, many of you know that 5,000 seems to be the actual limit for many end users that don't know they had to index their columns.
I'll spare you the details, but the 5,000 view threshold is actually necessary, or your entire SharePoint would be slowed down. It prevents SQL from locking the entire database, really.
Instead of removing this unpopular threshold, they automated the creation of Indexed Columns. This means that, technically, the limit is still there, but you won’t have to worry about it.
SharePoint 2016 Removed 5000 View Threshold – sort of

Increased File Size for uploads

Though I still wouldn’t recommend storing large files in SharePoint, you can now go way beyond the previous 2GB limit for files. Though there's no real limit, Microsoft has strongly recommended it stays at 10GB. Otherwise, end users will very likely get disconnected, or get a time out while uploading large files.

Fast Site Creation

By using a template, they're now able to create Site Collections in 1 second. This compares well to SharePoint 2013 that takes up almost over 40 seconds sometimes. This will require a level of configuration with PowerShell to set up.

New Compliance Center in SharePoint 2016

Not only can you leverage a lot of the compliance features in Office 365 with your On-Premises SharePoint 2016, new sites have been introduced to help you stay in control.
The In-Place Policy Hold Center and the Compliance Center allow you to build your own policies and apply them against your environment. New basic policies allow you to delete data in OneDrive for Business sites after an x amount of years for example, not unlike “Retention Policies” if you think about it.
New SharePoint 2016 Compliance Center

New Collaboration Experience in SharePoint 2016

Can’t really go to work without a mobile device of some kind these days and that expands to tablets as well now. For this reason, you’ll find SharePoint 2016 comes with a touch friendly interface.
New Collaboration Experience in SharePoint 2016

Durable Links

The concept is simple, make sure that links you sent to people to open or work on your content continues to work regardless of what happens to the document. If the file name is changed or the document moved, durable links should make it seamless to the user.
Problem is, I have no idea how it actually works for a SharePoint user. I took the URL in the hover panel of a picture, changed the filename and pasted the old URL and it did not work. I am sure I am missing something, but will update this as soon as I find out more.
Update: It turns out that Durable Links isn't necessarily a SharePoint 2016 new feature, you'll actually need to have Office Online Server previously known as Office Web Apps Server. Granted we typically have this when installing SharePoint On-Premises so customers should benefit from Durable Links anyway. It works as described meaning your URLs to documents will always work, great news.

Site Folders

The OneDrive for Business area is turning out to be more than just a My Site. It aims to bring users to one place to help them work with their files regardless of where they are. Now, you’ll also be able to navigate your Sites and their libraries from there.
SharePoint 2016 Site Folders

Tuesday, May 21, 2019

Remote Event Receiver

https://blog.virtosoftware.com/remote-event-receivers-creating-and-debugging-sharepoint-online/
FEW VERY USEFUL LINKS -
https://docs.microsoft.com/en-us/sharepoint/dev/sp-add-ins/handle-events-in-sharepoint-add-ins
https://docs.microsoft.com/en-us/sharepoint/dev/sp-add-ins/create-a-remote-event-receiver-in-sharepoint-add-ins
https://docs.microsoft.com/en-us/sharepoint/dev/sp-add-ins/create-an-add-in-event-receiver-in-sharepoint-add-ins
https://docs.microsoft.com/en-us/sharepoint/dev/sp-add-ins/debug-and-troubleshoot-a-remote-event-receiver-in-a-sharepoint-add-in


Remote Event Receivers Creating and Debugging in SharePoint Online

In this post we will describe how to create and debug Remote Event Receivers for SharePoint Online (Office 365). As an example, we will create a project, which will have an event receiver that is triggered on item creation in Report list.
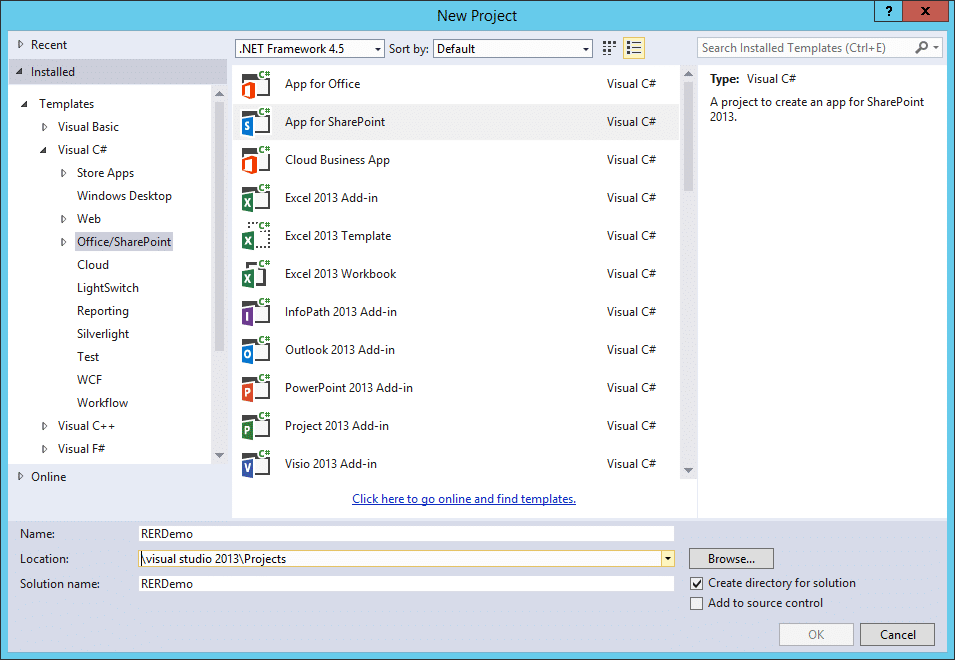
Create a project in Visual Studio 2013. Select the App for SharePoint template.
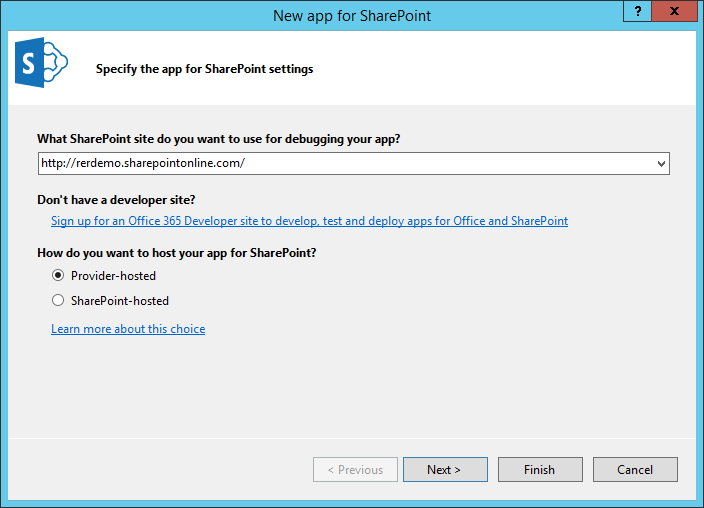
Remote event receivers are supported only by Provider-hosted applications, that is why we choose this type. To create the application, we also need an account in Office 365 (you can purchase a licensed version from the developer, or use a 30 days trial).
Enter the website address where our application will be accessed.
Choose the type of web application. Our example – Asp.Net MVC Web Application. Click Next.
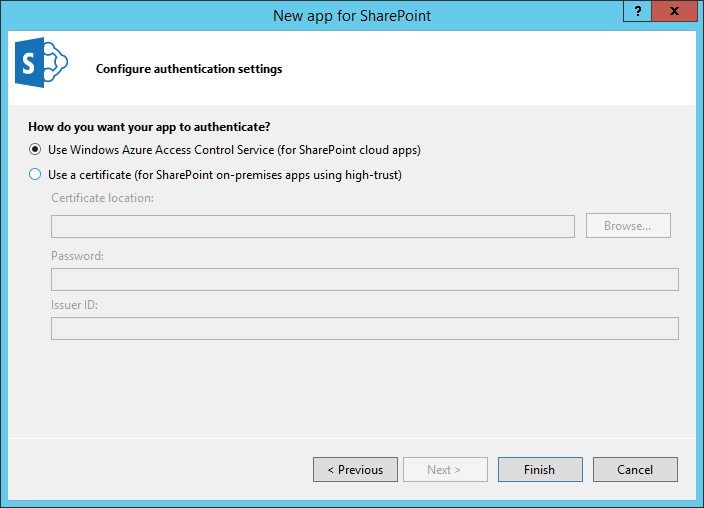
Window with a choice of the authentication type will appear. In our case we used Azure Access Control Service.
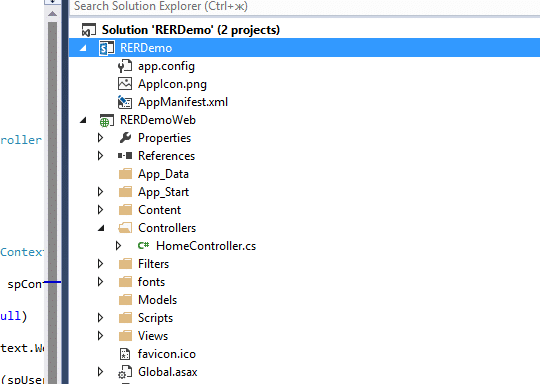
Click Finish. Thus, the solution is created. It consists of two projects. RERDemo – is the actual application (app) for SharePoint, the second RERDemoWeb – is a website service that is responsible for receiving events.
Let’s add Report list to our application.
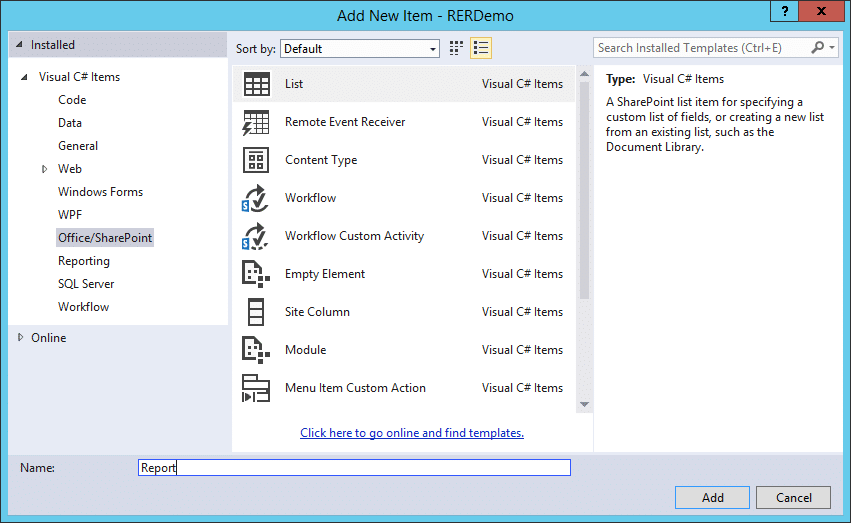
To do this, perform the following steps: right click on the title of the project RERDemo -> Add .. -> New Item … -> List. Enter the list name Report
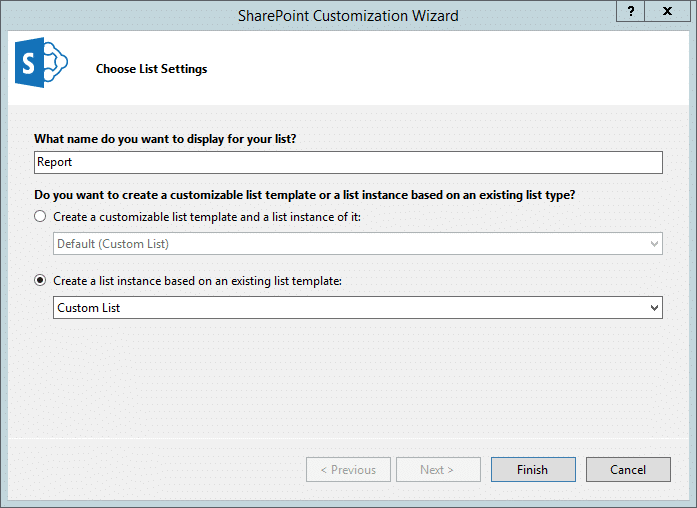
In the settings window, select: Create a list instance based on an existing list template, namely Custom List. Click Finish.
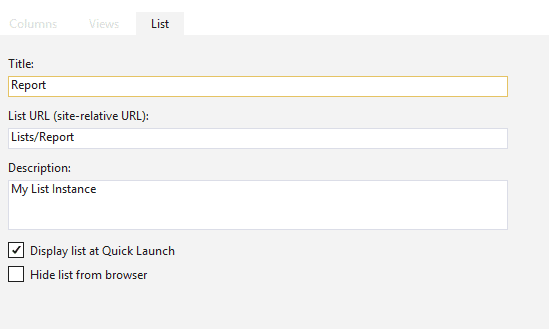
After creating the list, a tab with the list instance settings opens. There is no need to change anything, so we close it.
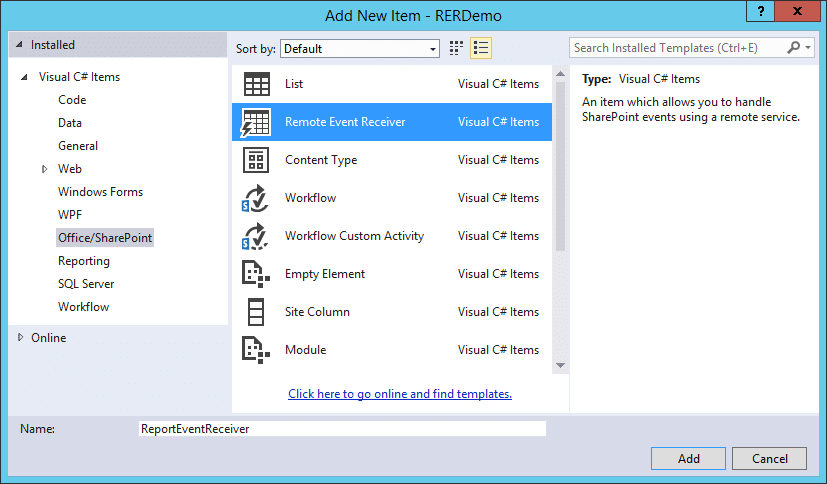
Add an event receiver. To do this, right click on the project name RERDemo in Solution Explorer -> Add -> New Item …
In the appeared window, select Remote Event Receiver. Let’s name it ReportEventReceiver. Click Add.
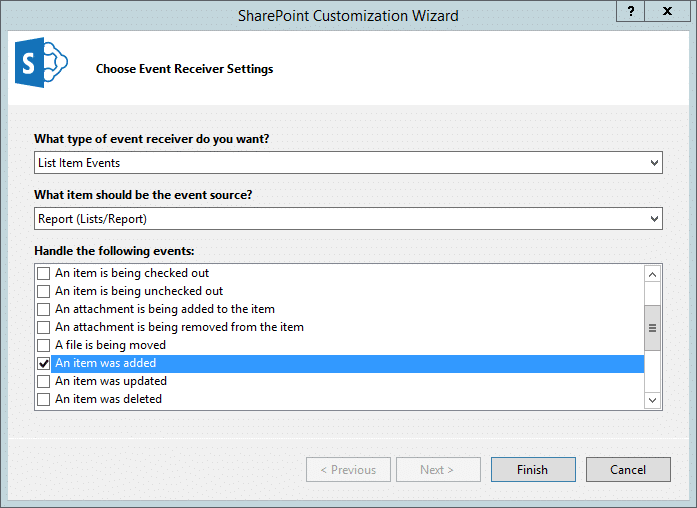
You should see the window with the event receiver settings. Select the type of event receiver – List Items Events. Then choose the event source – Report (List/Report). And for our example, select the type of received events – An item was added (ie, our receiver will be triggered after the creation of an element in the Report list).
Once you click finish button, in Visual Studio opens the tab with code of the receiver. We will examine it later. Now take a look at changes in the Solution Explorer. In the RERDemo project appears ReportEventReceiver element. If you open it, you will see the layout that is responsible for adding the receiver to the Report list.
In layout there are settings that we have set when created the receiver. Here we are interested in the Url element. It has the address of the service, which will be triggered when event appears. ~ remoteAppUrl – is a token that will be replaced with the real address of our service.
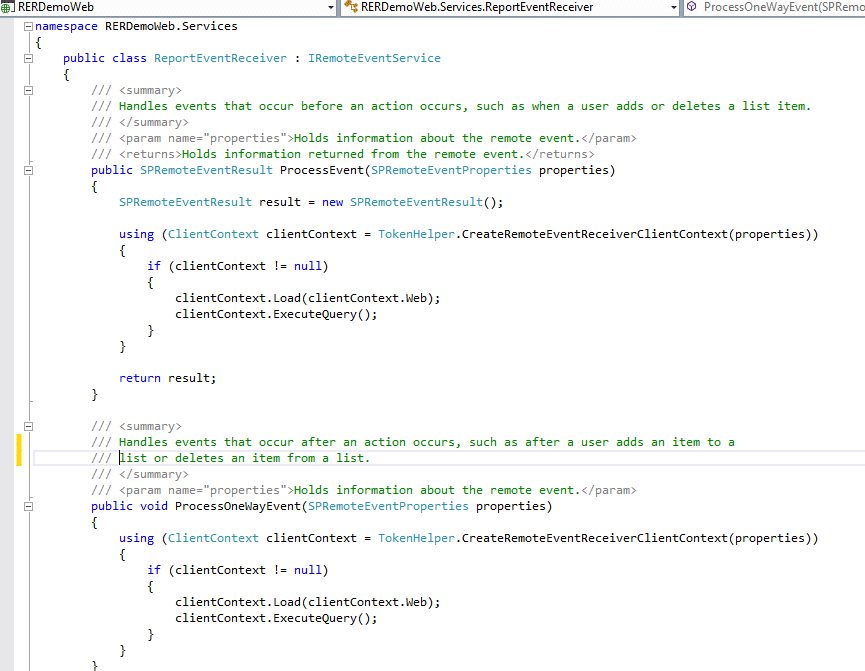
Let’s take a look at the RERDemoWeb project. There is Services folder, which has the code for our receiver service. Double-click on ReportEventReceiver.svc, to see the service code.
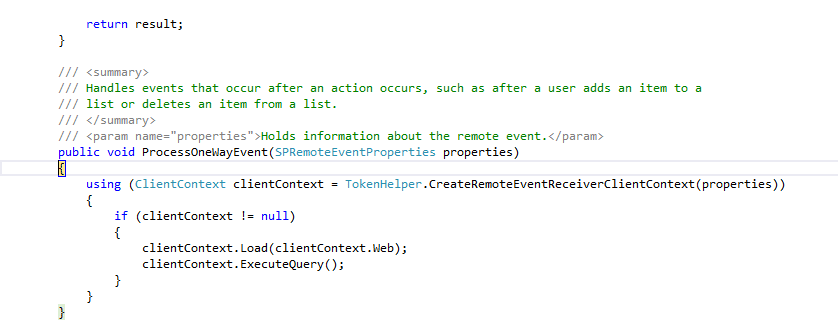
ReportEventReceiver implements IRemoteEventService interface, namely two methods: ProcessEvent and ProcessOneWayEvent. The first will be called when synchronous events will be triggered, the second – when asynchronous ones.
Due to fact that our receiver is triggered when an element has already been created (but not when an element is creating), this method is called ProcessOneWayEvent. Unlike the ProcessEvent method, which may affect the event itself by the return value of SPRemoteEventResult result, ProcessOneWayEvent method works in one direction (what OneWay says in its name).
Creation of our application is complete for now. We have not written a single line of code, Visual Studio made it for us. Let’s run our application in debug mode and see what happens. Put a breakpoint in the method of ProcessOneWayEvent and press F5 …
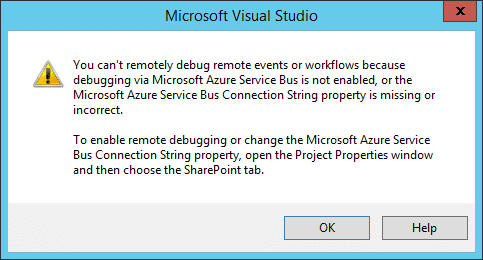
We get a warning message that we cannot debug remote events without turning on Microsoft Azure Service Bus. Click OK, close the IE window that opened, and let’s figure out what it means.
When an event appears (creating an element in the Report list), the service responsible for receiving an event will be triggered. However, when debugging, our service will be located in the localhost (on our computer). Roughly speaking, when there will be an event on your site on SharePoint Online, there will be created a request to https: //localhost/Services/ReportEventReceiver.svc, which is not unique.
Azure Service Bus (messaging service) helps to get through this issue. It allows to call for our event receiver, which is located in localhost.
You can read more on msdn, now we move to the service configuration. To do this, we need an account in Microsoft Azure. You can get it for free for 30 days.
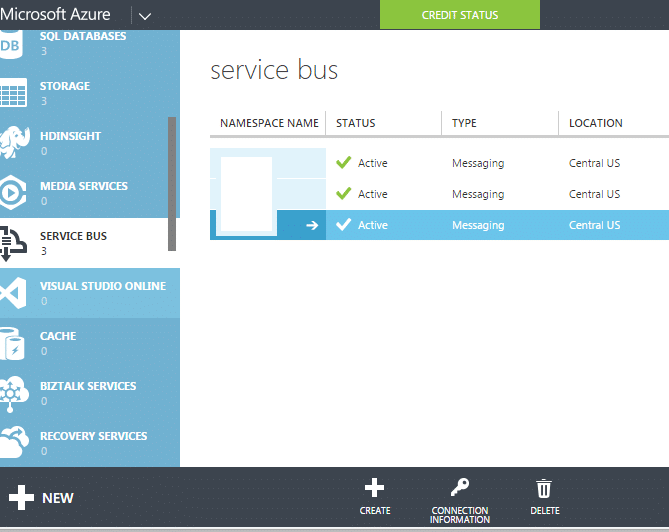
Go to the Azure portal, open the Service Bus tab, click Create.
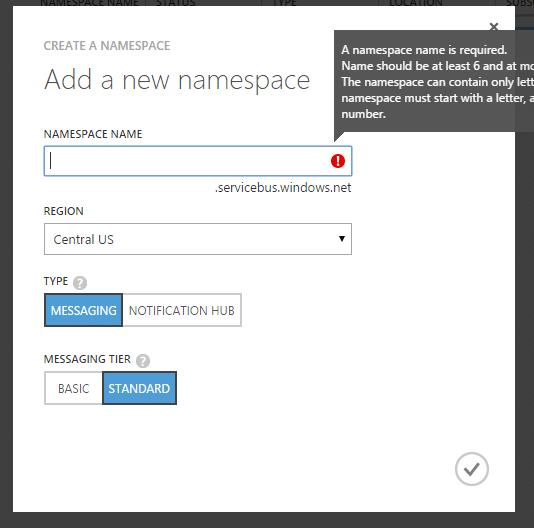
In the appeared window, enter the name and leave the rest of settings without changes, click the tick.
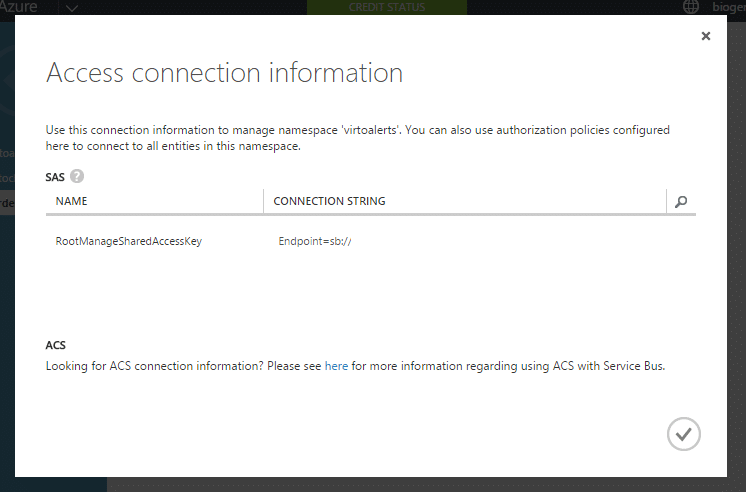
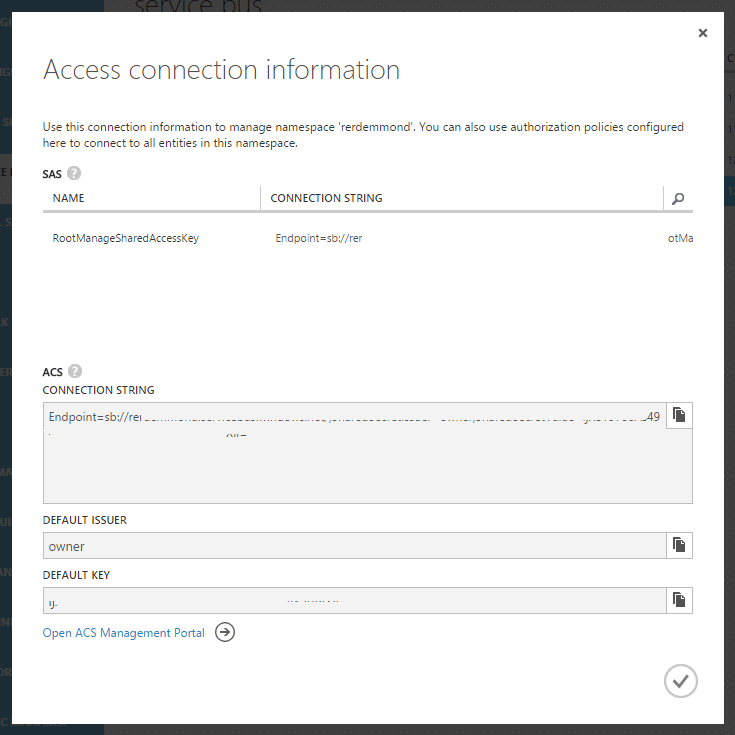
When Service Bus is created, press on its name, then click CONNECTION INFORMATION. A window with information on connection to created service will appear.
At the moment there are two types of connection: SAS and ACS. In order to be able to debug event receivers through Visual Studio, we need the ACS type of connection. However, in the above image we can see, that there is no such connection. Congratulations, we have created something that cannot be used for debugging. How to create the ACS connection string through the Azure portal? – It’s impossible!
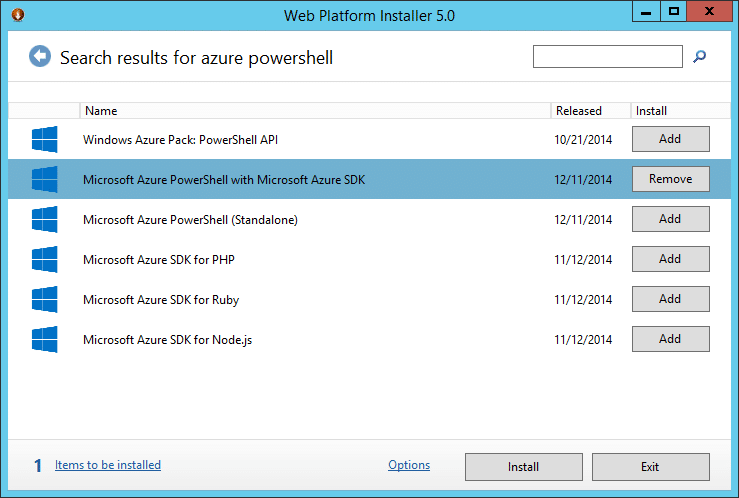
Therefore, close the Access connection information window. Next remove our Service Bus. To create a Service Bus with ACS, we need Microsoft Azure PowerShell. Open Web Platform Installer (or install it, if you have not done it yet). Enter it in the search line: Microsoft Azure PowerShell. Then install Microsoft Azure PowerShell with Microsoft Azure SDK.
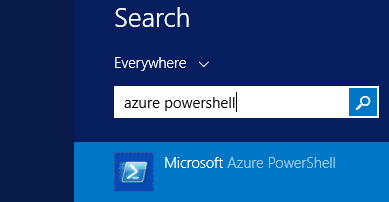
After installation is complete, run the Azure PowerShell
After launching Azure Powershell, perform following commands:
Add-AzureAccount
Get-AzureSubscription
Select-AzureSubscriptionSubscription_name
After you enter the first command, you will be asked to log in. Then we get the name of our subscription. And in the third command we choose subscription.
Enter the last command: New-AzureSBNamespace ‘Service_Bus_Name’ -CreateACSNamespace $ true -NamespaceType Messaging (think of some name and write it in quotes).
Open Azure Portal again, find the created service bus, click CONNECTION INFORMATION.
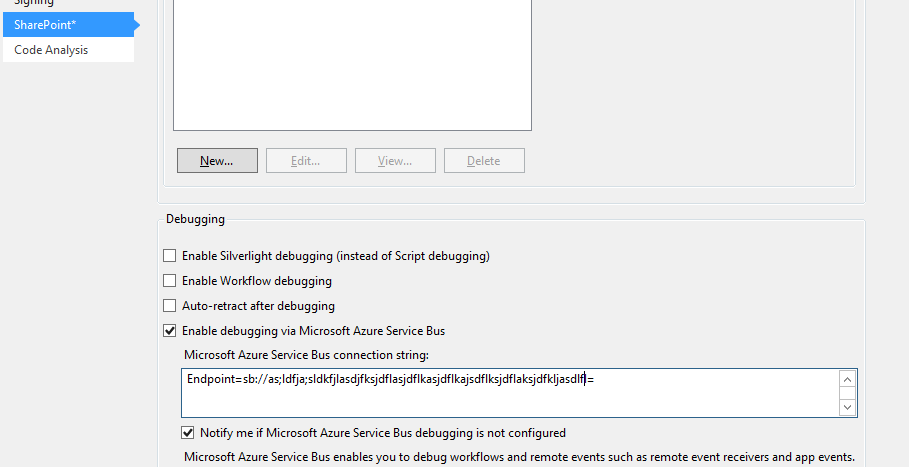
We now have the ACS connection string. Copy it to the clipboard and return to Visual Studio. Right click on the project name RERDemo and choose the project properties. Go to the SharePoint section, then at the bottom click the tick – Enable debugging via Microsoft Service Bus, paste the connection string to the clipboard.
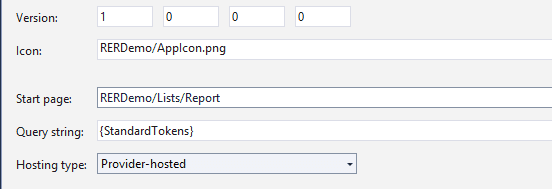
Now we have just a few steps to go. In RERDemo project double click on the file – AppManifest.xml. And in the window that appears, set the value in the StartPage RERDemo / Lists / Report
We did this in order to open a page with our Report list when launching, in which we will be creating elements. So now let’s start our solution in debug mode – press F5.
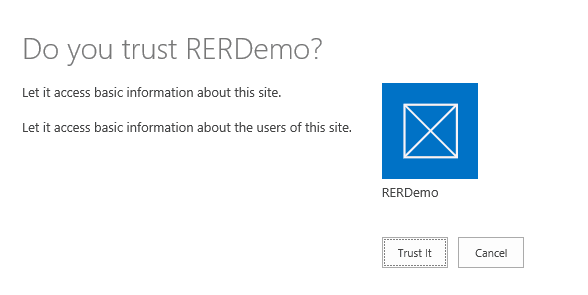
Trust the application:
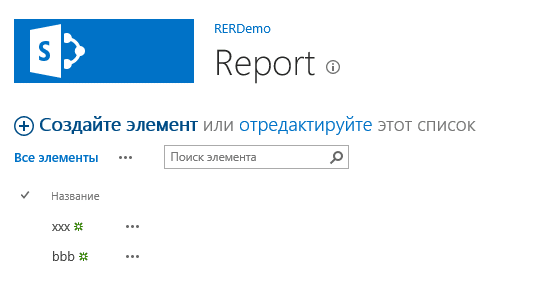
This will open the view of Report list:
Create an element and …. Yay! Visual Studio icon on the toolbar flashes in yellow, which means our breakpoint worked out.
In the next post we will describe how to connect remote event receivers for lists that are on the web site (not on the web application, like in this example).

Event Receivers vs Workflows vs timerjobs

Main Differences Between SharePoint Event Receivers and SharePoint Workflows are:

1. Event handlers Can't be manually initiated - workflows can be initiated either automatically or manually.

2. Event Handlers can be Synchronous or Asynchronous - Workflows are always async (They executes after the operation)

3. In Event Receivers we can cancel the operation (such as add/update/delete) - But in Workflows its not possible. 

4. Event handlers execute from a Particular WFE, So when some thing goes wrong in that WFE, It may end-up. But Workflow Jobs are robust and  can resume even after Reboots. 

5. Usually Event handlers runs for short period - Workflows can be longer even for years!

6. There is no User Interface/user Interaction in Event Receivers - Workflows can have user interactions such as getting user input in Initiation forms.

7. As the Name indicates, SharePoint Event receivers are triggered by events like New Item Adding-Added, Updating-Updated, Deleting-Deleted, etc. - But Workflows triggered only on Creation/Change/deletion.

8. Event Receivers are created using Visual studio - Workflows can be via SharePoint user interface, SharePoint Designer, Visio or Visual studio.

9. Workflows leaves "Workflow History" logs which we can refer for debugging - Event handler doesn't do such.

10. Event receivers are better for large volume - Workflows are better for small amount of data.


#Read more: http://www.sharepointdiary.com/2012/08/event-receivers-vs-workflows-decide.html#ixzz5ocJRJGIv


WorkFlow:
SharePoint Workflow consist a set of task(s) which can be triggered both manually and automatically. In most of the scenarios, Workflows and Event Receives perform the same functionality. SharePoint Workflows are created in SharePoint Designer, Microsoft Visio and of course through Visual Studio. For the beginners, Workflows are the best option to start from as they can be easily created through SharePoint Designer or MS Visio. SharePoint Workflows are used to perform a set of tasks if an item is changed, created, deleted and etc. or in other words the workflow is triggered once an action is completed. The most common examples of workflows are to move an item to another List/Site once it is completed, or to generate custom emails through Workflows and etc.
Event Receivers:
SharePoint Event Receivers as from its name are triggered upon an event. Unlike Workflows, Event Receivers can be triggered even when an item is being created or modified or etc. To create an Event Receiver, you need to use Visual Studio. When it comes to robustness, Workflows are more robust than event receivers. They can survive system reboot and while in few cases Event receivers cant. Unlike Workflows, Event Receivers cannot be triggered manually.
Timer Jobs:
Lastly, SharePoint Timer Jobs. Timer Jobs are triggered both automatically and manually after a defined period. Timer Jobs, like Event Receivers, are created through Visual Studio. Timer Jobs are different from above two in terms that they are triggered only at the mentioned time. They can also be triggered manually but that’s not why they are created. Let’s say you want to assign some administrative tasks to the users on daily or weekly basis, that’s where you use timer job.

TimerJobs in SharePoint

Monday, May 20, 2019

What's new in workflows for SharePoint 2013

Completely redesigned workflow infrastructure

SharePoint workflows are powered by Windows Workflow Foundation 4 (WF), which was substantially redesigned from previous versions. Windows Workflow Foundation, in turn, is built on the messaging functionality that is provided by Windows Communication Foundation (WCF).
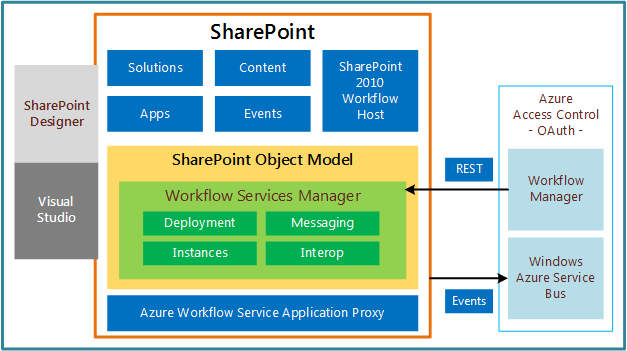
Perhaps the most prominent feature of the new workflow infrastructure is the introduction of Microsoft Azure as the new workflow execution host. The workflow execution engine now lives outside of SharePoint, in Microsoft Azure. Figure 1 provides a generalized, high-level view of the new workflow infrastructure. For a more thorough discussion of the concepts presented in Figure 1, see SharePoint workflow fundamentals.
Figure 1. High-level architecture of the workflow infrastructure
High-level workflow architecture

Fully declarative, no-code authoring environment

Another of the prominent changes is that workflows on the WF 4 platform are fully declarative. That is, workflows are no longer compiled into managed assemblies and deployed to an assembly cache. Instead, XAML files define your workflows and frame their execution.

Enhanced SharePoint Designer 2013 authoring support

SharePoint Designer 2013 has been updated with the goal of making it the authoring environment of choice for authoring SharePoint workflows. SharePoint Designer 2013 provides workflow authors with both a designer surface and a text-based workflow authoring environment. Additionally, you can develop workflow custom actions in Visual Studio 2012 and then import them into SharePoint Designer 2013, where they can then be accessed from the Workflow Designer.
In short, the needs of both the information worker (the "power user") and the developer have been harnessed in SharePoint workflow authoring and development environments.

Visual Studio 2012 workflow project type support

To make collaboration easier between information worker and software developer, Visual Studio 2012 provides SharePoint workflow project types and a workflow custom action-item type. For more information about developing workflows by using Visual Studio 2012, and for information about differentiating between SharePoint Designer 2013 and Visual Studio 2012 in workflow development, see Develop SharePoint workflows using Visual Studio.

Support for creating custom actions

A lot of effort has gone into anticipating the business requirements of workflow authors in the providing of workflow templates, actions, and activities in SharePoint Designer 2013 and in Visual Studio 2012. However, we also know that we cannot anticipate each person's specific needs. For this reason, Visual Studio 2012 provides a workflow custom action-item type that lets developers create custom actions. For more information about workflow custom actions, see How to: Build and deploy workflow custom actions.

Tools support for SharePoint workflows

Visual Studio 2012 provides templates and support for creating workflows on the SharePoint workflow framework. SharePoint workflows are similar to previous versions of workflows except that they are powered by WF 4 and run in Microsoft Azure. They are also declarative-only (XAML) and designed to interact with the cloud and work with SharePoint Add-ins. One of their primary benefits is that they enable you to remotely host and run workflows outside SharePoint Server.

New workflow actions

Following are new workflow actions that are provided in SharePoint. For a full detailing of both new and deprecated actions, see Workflow actions and activities reference for SharePoint. New to workflows in SharePoint are a set of workflow actions that allow you to integrate with Project 2013 and let you create Project-based workflows.
Table 1. New workflow actions in SharePoint
ActionDescription
Assign a Task Assigns a single workflow task to a user or group. 
Start a Task Process Initiates execution of a task process. 
Go to This Stage Specifies the next stage in a workflow to which flow control should be handed. 
Call HTTP Web Service Functions as a method call to a Representational State Transfer (REST) endpoint. 
Start a List Workflow Starts a list-scoped workflow. 
Start a Site Workflow Starts a site-scoped workflow. 
Build DynamicValue Creates a new variable of type DynamicValue
Get Property from DynamicValue Retrieves a property value from a specified variable of type DynamicValue
Count Items in DynamicValue Returns the number of rows in a variable of type DynamicValue
Trim String Removes all leading and trailing white-space characters from the current string.
Find Substring in String Returns 1-based index of the first occurrence of one or more characters, or the first occurrence of a string, within a string. 
Replace Substring in String Returns a new string in which all occurrences of a specified character or string are replaced with another specified character or string. 
Translate Document Functions as a wrapper around the HTTP activity that calls the synchronous translation API. You must configure a Machine Translation Service Application for the SharePoint site on which you run the workflow. 
Set Workflow Status Updates workflow status as specified in message string. 
Create a Project from Current Item [Microsoft Project] Creates a Project Server project based on the current item. 
Set the current project stage status to this value [Microsoft Project] Sets the two status fields within the current stage of the project. 
Set the status field in the idea list item to this value [Microsoft Project]Updates the status field of the original SharePoint list item. 
Wait for Project Event [Microsoft Project] Pauses the current instance of the workflow to await a specified Project event: Project checked in, Project committed, Project submitted. 
Set this field in the project to this value [Microsoft Project] Sets the value for the enterprise custom field for a specified project.

Source - 

Sunday, May 19, 2019

Visual Web Parts vs. Traditional Web Parts; Web User Control vs Web Part

Differences between a Web User Control and a Web Part

When making the decision on whether to use a user control or Web Part to retrieve and display content on a SharePoint portal, you should understand the advantages and disadvantages of each approach.
User Control
Web Part
User controls are based on Microsoft ASP.NET, and most developers are familiar with developing user controls. This improves productivity.
In general, developers are not familiar with creating child controls by writing the code from scratch.
User controls can be used with ASP.NET -based solutions. If you decide later to convert a project containing a user control to an ASP.NET -based solution, you should be able to use the control without making any changes.
Web Parts can be used in ASP.NET -based solutions only when the solution uses Web Parts pages.
The Visual Web Developer designer provides support for designing the UI by using drag-and-drop operations that gives the control a consistent look-and-feel, which results in faster development.
The controls in Web Parts must be added by using code.
User controls must be compiled before use, which adds to the time it takes to load the control.
Web Parts are precompiled and ready for use as soon as you need them.

Differences between Visual Web Parts and Code-Only Web Parts

Microsoft SharePoint 2010 introduced Visual Web Parts. Visual Web Parts are similar to user controls in that you can simply drag and drop items from the Toolbox onto your custom controls to create a Web Part UI. You also get the code-behind file where you implement the UI logic. Technically, the SharePoint 2010 Visual Web Part is an ASCX web user control that is hosted inside a standard Web Part.
A Visual Web Part is simply a classic Web Part that automatically loads the web user control with it. The advantage of this approach is that you can use Visual Web Developer to design the web user control. Traditional Web Parts differ from Visual Web Parts in several ways.

Differences in Web Part Properties

Adding Web Part properties is cumbersome for Visual Web Parts as compared to traditional Web Parts. As you develop Web Parts, many times you will want to expose their properties so that users and administrators can supply the values for those properties.
Traditional Web Part
When you create a new Web Part (in this case SimpleWebPart), the SimpleWebPart.cs file is created for you. This is where you define the Web Part properties that inherit from the WebPart class. The following code snippet defines a Web Part property, named MyProperty, to display to a user.
C#
public static string myprop;

    [WebBrowsable(true),
    Category("Configuration"),
    Personalizable(PersonalizationScope.Shared),
    DefaultValue(""),
    WebDisplayName("Property Title"),
    WebDescription("Property Description")]
    public string MyProperty
    {
        get { return myprop; }
        set { myprop = value; }
    }
Visual Web Part
When you create a new Visual Web Part, (for example, SimpleVisualWebPart), the following files are created for you:
  • SimpleVisualWebPart.cs
  • SimpleVisualWebPartUserControl.ascx
  • SimpleVisualWebPartUserControl.ascx.cs
These files contain the logic for the Web Part that is defined in the SimpleVisualWebPart object.

To define a custom property in a Visual Web Part

  1. In the code-behind file for your user control (in this example, SimpleVisualWebPartUserControl.ascx.cs), declare a property.
    C#
    public SimpleVisualWebPart WebPart { get; set; }
    
  2. In the SimpleVisualWebPart.cs file, define the property as follows.
    C#
    [Personalizable(),
        WebBrowsable, 
        DefaultValue("Tasks"), 
        DisplayName("Name of the Tasks List"),
        Category("Task WebPart Settings")]
        public string ListName { get; set; }
    protected override void CreateChildControls()
    {
        SimpleVisualWebPartUserControl control = 
            Page.LoadControl(_ascxPath) as SimpleVisualWebPartUserControl;
        if (control != null)
        {
            control.WebPart = this;
        }
            Controls.Add(control);
    }
    
  3. You can now use the property in the code for your user control.
    C#
    if (this.WebPart != null && 
        this.WebPart.ListName != null && 
        this.WebPart.ListName.Length > 0)
    {
        TextBox1.Text = web.Lists.TryGetList(this.WebPart.ListName);
    }
    

Differences in Sandboxed Solutions

Sandboxed solutions, a feature in SharePoint 2010, can be deployed by site collection administrators (or any user with appropriate permissions) and enable site administrators to deploy WSP packages, allocate resource quotas, and monitor the resource usage of sandboxed solutions. Sandboxed solutions have access to only a subset of objects in the SharePoint object model. Because they run in isolation, they do not pose a threat to the farm in cases of malicious software.
Farm solutions, though, can be deployed only by farm site administrators and require full trust that allows unrestricted access to the entire SharePoint object model. Visual Web Parts can be deployed only as farm solutions because they deploy the user controls to the SharePoint root folder. Traditional Web Parts can be deployed as sandboxed solutions. Consider the case in which you create a Web Part that contains an indefinite loop, and you deploy that as sandboxed solution. Because it is a sandboxed solution, the code does not put your SharePoint farm in danger. Instead, it displays a message similar to the one shown in Figure 1.
Figure 1. Web Part error
Web Part error
The Microsoft Visual Studio team has released the Visual Studio 2010 SharePoint Power Tools. These tools extend the existing SharePoint 2010 project templates and provide the Sandboxed Visual Web Part template that enables you to create Web Parts that can be deployed as sandboxed solutions. The use of these templates also enables designer support for designing the Web Parts.

Differences in Web Part Connections

Web Part connections are interfaces that define the communications between a Web Part provider and a Web Part consumer. The provider Web Part exposes data to an interface that you specify, which can then be used to consume the data in the consumer Web Part. This is easily achieved in a traditional Web Part because the logic code is contained in the Web Part itself.
In a Visual Web Part, the Web Part loads the user control, which contains the control logic. This can be implemented by using an approach similar to that of implementing Visual Web Part properties described in the previous section. The following steps demonstrate specifying Visual Web Part connections.

To set up Visual Web Part connections

  1. Create the interface to provide and consume the data.
    C#
    public interface IProvideMyName { int Name { get; } }
    
  2. Create the provider Web Part and specify its connections as follows.
    C#
    [ConnectionProvider("Name")]
        IProvideMyName Name()
        {
            return this;
        }
        int IProvideMyName.Name
        {
            get
            {
                return "Provider Web Part";
            }
         }
    
  3. Create the consumer Web Part to consume the data from the provider.
    C#
    public class ConsumerWebPart : WebPart
        {
            private const string _ascxPath = 
                @"~/_CONTROLTEMPLATES/WebPartConnections/MyConsumer/ConsumerWebPartUserControl.ascx";
            protected override void CreateChildControls() 
            { 
                ConsumerWebPartUserControl control = 
                    Page.LoadControl(_ascxPath) as ConsumerWebPartUserControl;
    
                // Assign the current Web Part instance to the property of user control.
                control.WebPart = this; 
                Controls.Add(control);
            } 
    
            public int Name { get; set; }
            [ConnectionConsumer("Name")]
            public void SetName(IProvideMyName provider)
            { 
                if (provider != null) 
                {
                    this.Name = provider.Name;
                } 
            }
        }
    
        public partial class ConsumerWebPartUserControl : UserControl
        {
            public ConsumerWebPart WebPart { get; set; }
            protected override void OnPreRender(EventArgs e)
            {
                base.OnPreRender(e);
                this.Label1.Text = this.WebPart.Name.ToString();
            }
        }
    
  4. Add the Web Parts to the Web Parts page and connect them by using the provider name.

Differences when Extending a Web Part

You can extend the traditional Web Part by inheriting from the WebPart class. You can then reuse the base Web Part functionality and extend it as desired. Visual Web Parts cannot be extended. Because this Web Part is a wrapper around a user control, it just contains the code to load the user control; the bulk of the Web Part code resides in the code-behind file of the user control.

Differences in Performance and Memory Footprint

Visual Web Parts have slightly larger memory footprints than code-only Web Parts. Visual Web Parts contain more parts (Web Part, user control) than traditional Web Parts. Thus, loading a Visual Web Part takes longer than a traditional Web Part, resulting in poorer performance. Additionally, creating a Visual Web Part by using the Visual Web Developer designer may add more controls and objects than manually building the control hierarchy in the code in a traditional Web Part. This also has the potential to increase the memory footprint of a Visual Web Part.

Creating a Code-Only Web Part and a Visual Web Part

In this section, you see an example of developing both a code-only Web Part and a Visual Web Part to see the differences in implementing both approaches. The samples need to do the following:
  1. Create a Web Part that displays the contents of any SharePoint tasks list with specific conditions.
  2. Create two custom properties with the following conditions:
    • ListName property: If the list name is provided, read the records from that task list; if nothing is specified, read the records from the default tasks list.
    • AssignedTo property: If this property is specified, filter out the records with the given value; otherwise, filter the records with the currently logged-in user.

To create the code-only Web Part

  1. In Visual Studio 2010, create a new project by clicking New ProjectSharePoint2010, and then selecting Visual Web Part, as shown in Figure 2.
    Figure 2. Select a Visual Web Part template
    Select a Visual Web Part template
  2. Name the project SPVisualWebParts, and then click OK.
  3. The SharePoint Customization Wizard is displayed as shown in Figure 3. Specify the desired target site (in this case, http://localhost:38914), select Deploy as a farm solution, and then click Finish.
    Figure 3. SharePoint Customization Wizard screen
    SharePoint Customization Wizard screen
  4. Visual Studio 2010 creates the project. It automatically adds packaging and feature settings and a sample Visual Web Part. Delete the VisualWebPart1 file from Solution Explorer.
  5. In Solution Explorer, right-click SPVisualWebParts, click Add, click New Item, and then select Web Part. Name the Web Part TasksCustomWebPart, and then click Add (see Figure 4).
    Figure 4. Add a Web Part
    Add a Web Part
    Figure 5 shows what you should see in Solution Explorer.
    Figure 5. Files in Solution Explorer
    Files in Solution Explorer
    The project structure contains following items:
    • The Package folder specifies all settings that are required for a SharePoint 2010 solution. You can also configure some important settings like selecting which features you want to package.
    • The Features folder contains one or more feature definitions.
    • The TasksCustomWebPart folder contains the following files:
      • TasksCustomWebPart.webpart contains the Web Part default properties, such as Title and Description. It also contains metadata information such as the type and assembly that contains this Web Part.
      • Elements.xml contains settings for deploying the TasksCustomWebPart.webpart file into the URL _catalogs/wp.
      • TasksCustomWebPart.cs contains the actual implementation logic for the Web Part. This Web Part implements the class System.UI.WebControls.WebPart.
  6. Add the following code to the TasksCustomWebPart.cs file.
    C#
    /// Code of TasksCustomWebPart.cs file
    
    using System;
    using System.ComponentModel;
    using System.Drawing;
    using System.Web;
    using System.Web.UI;
    using System.Web.UI.WebControls;
    using System.Web.UI.WebControls.WebParts;
    using Microsoft.SharePoint;
    using Microsoft.SharePoint.WebControls;
    using System.Collections.Generic;
    using System.Text;
    
    namespace SPVisualWebParts.TasksCustomWebPart
    {
        /// <summary>
        /// TaskEntity that contains the properties for task list fields.
        /// </summary>
        public class TaskEntity
        {
            private string assignedTo;
    
            public string Title { get; set; }
            public string AssignedTo
            {
                get
                {
                    if (assignedTo.Length > 0)
                    {
                        string[] user =
                            assignedTo.Split(
                            SPFieldMultiChoiceValue.Delimiter.ToCharArray());
                        return user[user.Length - 1];
                    }
    
                    return string.Empty;
                }
                set { assignedTo = value; }
            }
            public string Description { get; set; }
            public string Status { get; set; }
            public string Priority { get; set; }
            public DateTime StartDate { get; set; }
            public DateTime DueDate { get; set; }
            public string href { get; set; }
    
        }
    
        /// <summary>
        /// Implementation of TasksCustomWebPart class.
        /// </summary>
        [ToolboxItemAttribute(false)]
        public class TasksCustomWebPart : WebPart
        {
            /// <summary>
            /// Assigned To property comes in custom properties of Web Part tool part.
            /// If the value is specified, the Web Part displays records filtered by that user.
            /// </summary>
            [Personalizable(), WebBrowsable, Category("Task WebPart Settings")]
            public string AssignedTo { get; set; }
    
            /// <summary>
            /// List Name property allows Web Part user to specify which tasks list to use to retrieve data.
            /// If nothing is specified, it takes Tasks as List Name.
            /// </summary>
            [Personalizable(),
            WebBrowsable,
            DefaultValue("Tasks"),
            Category("Task WebPart Settings")]
            public string ListName { get; set; }
    
            /// <summary>
            /// Grid view to display task results.
            /// </summary>
            private GridView gridViewTasks = default(GridView);
    
            protected override void CreateChildControls()
            {
                base.CreateChildControls();
    
                this.gridViewTasks = new GridView();
                this.gridViewTasks.ID = "GridViewTasks";
                this.gridViewTasks.AutoGenerateColumns = false;
                this.gridViewTasks.BackColor = 
                    System.Drawing.ColorTranslator.FromHtml("#DEBA84");
                this.gridViewTasks.BorderColor = 
                    System.Drawing.ColorTranslator.FromHtml("#DEBA84");
                this.gridViewTasks.BorderStyle = BorderStyle.None;
                this.gridViewTasks.BorderWidth = new Unit("1px");
                this.gridViewTasks.CellPadding = 3;
                this.gridViewTasks.CellSpacing = 2;
                this.gridViewTasks.EnableModelValidation = true;
    
                this.gridViewTasks.FooterStyle.BackColor = 
                    System.Drawing.ColorTranslator.FromHtml("#F7DFB5");
                this.gridViewTasks.FooterStyle.ForeColor = 
                    System.Drawing.ColorTranslator.FromHtml("#8C4510");
    
                this.gridViewTasks.HeaderStyle.BackColor =
                    System.Drawing.ColorTranslator.FromHtml("#A55129");
                this.gridViewTasks.HeaderStyle.Font.Bold = true;
                this.gridViewTasks.HeaderStyle.ForeColor = Color.White;
    
                this.gridViewTasks.PagerStyle.ForeColor =
                    System.Drawing.ColorTranslator.FromHtml("#8C4510");
                this.gridViewTasks.PagerStyle.HorizontalAlign = HorizontalAlign.Center;
    
                this.gridViewTasks.RowStyle.BackColor =
                    System.Drawing.ColorTranslator.FromHtml("#FFF7E7");
                this.gridViewTasks.RowStyle.ForeColor =
                    System.Drawing.ColorTranslator.FromHtml("#8C4510");
    
                this.gridViewTasks.SelectedRowStyle.BackColor =
                    System.Drawing.ColorTranslator.FromHtml("#738A9C");
                this.gridViewTasks.SelectedRowStyle.ForeColor = Color.White;
                this.gridViewTasks.SelectedRowStyle.Font.Bold = true;
    
                HyperLinkField title = new HyperLinkField();
                title.DataTextField = "Title";
                title.HeaderText = "Title";
                title.DatahrefFields = new string[] { "href"};
                this.gridViewTasks.Columns.Add(title);
    
    
                BoundField assignedTo = new BoundField();
                assignedTo.DataField = "AssignedTo";
                assignedTo.HeaderText = "Assigned To";
                this.gridViewTasks.Columns.Add(assignedTo);
    
    
                BoundField description = new BoundField();
                description.DataField = "Description";
                description.HeaderText = "Description";
                this.gridViewTasks.Columns.Add(description);
    
                BoundField status = new BoundField();
                status.DataField = "Status";
                status.HeaderText = "Status";
                this.gridViewTasks.Columns.Add(status);
    
                BoundField priority = new BoundField();
                priority.DataField = "Priority";
                priority.HeaderText = "Priority";
                this.gridViewTasks.Columns.Add(priority);
    
                BoundField startDate = new BoundField();
                startDate.DataField = "StartDate";
                startDate.HeaderText = "Start Date";
                startDate.DataFormatString = "{0:MMMM d, yyyy}";
                this.gridViewTasks.Columns.Add(startDate);
    
                BoundField dueDate = new BoundField();
                dueDate.DataField = "DueDate";
                dueDate.HeaderText = "Due Date";
                dueDate.DataFormatString = "{0:MMMM d, yyyy}";
                this.gridViewTasks.Columns.Add(dueDate);
    
                this.Controls.Add(this.gridViewTasks);
    
            }
    
            /// <param name="e"></param>
            protected override void OnLoad(EventArgs e)
            {
                base.OnLoad(e);
    
                EnsureChildControls();
    
                SPWeb web = SPContext.Current.Web;
                SPList list = default(SPList);
    
                // If ListName Web Part property is specified, use it. Use Tasks otherwise.
                if (this.ListName != null &&
                    this.ListName.Length > 0)
                {
                    list = web.Lists.TryGetList(this.ListName);
                }
                else
                {
                    list = web.Lists.TryGetList("Tasks");
                }
    
                this.gridViewTasks.DataSource = this.GetTasksEntity(list);
                this.gridViewTasks.DataBind();
            }
    
            /// <summary>
            /// Return the TaskEntity list with filtered results. 
            /// </summary>
            /// <param name="list">return the list of tasks.</param>
            /// <returns></returns>
            private List<TaskEntity> GetTasksEntity(SPList list)
            {
                List<TaskEntity> tasks = new List<TaskEntity>();
    
                StringBuilder sb = new StringBuilder();
                sb.Append("<Where>");
                sb.Append("     <Eq>");
                sb.Append("        <FieldRef Name='AssignedTo' />");
    
                // If AssignedTo Web Part property is specified, use it. Use current logged-in user otherwise.
                if (this.AssignedTo != null &&
                    this.AssignedTo.Length > 0)
                {
                    sb.Append(string.Format(
                        "        <Value Type='User'>{0}</Value>", this.AssignedTo));
                }
                else
                {
                    sb.Append(string.Format(
                        "        <Value Type='User'>{0}</Value>", SPContext.Current.Web.CurrentUser.Name));
                }
    
                sb.Append("     </Eq>");
                sb.Append("</Where>");
    
                SPQuery query = new SPQuery();
                query.Query = sb.ToString();
    
                SPListItemCollection items = list.GetItems(query);
    
                if (list != null && list.Items.Count > 0)
                {
                    foreach (SPListItem item in items)
                    {
                        TaskEntity task = new TaskEntity();
    
                        task.Title = this.GetFieldValue(item, "Title");
                        task.href = string.Concat(
                            list.DefaultDisplayFormUrl,
                            string.Format("?ID={0}", item.ID));
                        task.Description = this.GetFieldValue(item, "Description");
                        task.AssignedTo = this.GetFieldValue(item, "AssignedTo");
                        task.Status = this.GetFieldValue(item, "Status");
                        task.Priority = this.GetFieldValue(item, "Priority");
                        task.StartDate = DateTime.Parse(item["StartDate"].ToString());
                        task.DueDate = DateTime.Parse(item["DueDate"].ToString());
    
                        tasks.Add(task);
                    }
                }
    
                return tasks;
            }
    
            /// <summary>
            /// Get the item field value. Also, check if the field is available before accessing.
            /// </summary>
            /// <param name="item"></param>
            /// <param name="fieldName"></param>
            /// <returns></returns>
            private string GetFieldValue(SPListItem item, string fieldName)
            {
                string strFieldValue = string.Empty;
    
                if (item != null && item.Fields.ContainsField(fieldName) && item[fieldName] != null)
                {
                    strFieldValue = item[fieldName].ToString();
                }
    
                return strFieldValue;
            }
        }
    }
    
    Because this is an example of a code-only Web Part, it doesn't have the Visual Studio 2010 designer capabilities to design the controls. All controls are created in the code itself. The code contains the following methods:
    • CreateChildControls   The code overrides this method and adds all of the controls to show in the UI. This example demonstrates that the entire design of a grid view is done with coding. All header styles, footer styles, and other settings are coded in this method.
    • OnLoad   The code overrides this method to retrieve data from any data source and then bind the data to the UI controls. It calls EnsureChildControls to wait until the CreateChildControls method execution finishes. The Web Part retrieves data from the Tasks list data source and binds the data to the grid view. To bind the retrieved data to the UI control during the postback button-click event, bind the data in the OnPreRender method because the button-click event handler might change the data in the data source.
  7. To deploy the solution, in Solution Explorer, right-click SPVisualWebParts and then click Deploy. Visual Studio 2010 builds the solution package and deploys the solution (as shown in Figure 6).
    Figure 6. Deploy the Web Part
    Deploy the Web Part
  8. In the SharePoint site where the solution is deployed, click Site Actions and then click View All Site Content, as shown in Figure 7.
    Figure 7. Navigate to View All Site Content
    Navigate to View All Site Content
  9. Click Create. In the Create page. click Page and then click Web Part Page (see Figure 8) to create a new Web Parts page.
    Figure 8. Create a new Web Part page
    Create a new Web Part Page
  10. When the Web Parts page is created, it is shown in edit mode. Click Add Web Part. In the Categories list, select Custom. In the Web Parts list, select TasksCustomWebPart (see Figure 9) and click Add.
    Figure 9. Add TasksCustomWebPart Web Part to the page
    Add TasksCustomWebPart Web Part to the Page
  11. Now the Web Parts page should resemble Figure 10.
    Figure 10. Add the Web Part to the page
    Add the Web Part to the page
  12. Navigate to the Web Parts page and click Edit Web Part, as shown in Figure 11, to change the properties of the Web Part.
    Figure 11. Location of Edit Web Part menu item
    Select Edit Web Part menu
  13. Change the AssignedTo property to Sriram Sundaresan and the ListName property to Tasks, as shown in Figure 12.
    Figure 12. Set the custom properties
    Set the custom properties
    The updated results resemble to Figure 13.
    Figure 13. Updated page
    Updated page

To create a Visual Web Part

  1. Use same project (SPVisualWebParts) for the code-only Web Part. In Solution Explorer, right-click, click Add, and then click New Item. In the Add New Item window, select the Visual Web Part item template in the SharePoint 2010 group; by default, Visual Web Part is selected. Name the new Web Part TasksVisualWebPart (as shown in Figure 14) and then click Add.
    Figure 14. Add a new Visual Web Part
    Add a new Visual Web Part
    Solution Explorer should resemble to Figure 15.
    Figure 15. Updated project
    Updated project
    A folder (named TasksVisualWebPart) for the new Web Part now contains all the necessary supporting files.
    • TasksVisualWebPart.webpart   Contains the Web Part default properties such as Title and Description. It also contains metadata information such as the type of the Web Part and the name of the assembly that contains the Web Part.
    • Elements.xml   Contains the settings for deploying the TasksVisualWebPart.webpart file into the URL _catalogs/wp.
    • TasksVisualWebPart.cs   Contains the logic to load the user control inside the Web Part. This Web Part implements the class System.UI.WebControls.WebPart.
    • TasksVisualWebPartUserControl.ascx   The web user control used to design the UI by using Visual Studio support.
    • TasksVisualWebPartUserControl.ascx.cs   The code-behind file for the web user control. It contains the logic that retrieves the data and binds the results to the UI controls.
    • TasksVisualWebPart.cs    Contains the following code.
      C#
      using System;
      using System.ComponentModel;
      using System.Web;
      using System.Web.UI;
      using System.Web.UI.WebControls;
      using System.Web.UI.WebControls.WebParts;
      using Microsoft.SharePoint;
      using Microsoft.SharePoint.WebControls;
      
      namespace SPVisualWebParts.TasksVisualWebPart
      {
          [ToolboxItemAttribute(false)]
          public class TasksVisualWebPart : WebPart
          {
              // Visual Studio might automatically update this path
              // when you change the Visual Web Part project item.
              private const string _ascxPath = 
                @"~/_CONTROLTEMPLATES/SPVisualWebParts/TasksVisualWebPart/TasksVisualWebPartUserControl.ascx";
      
              protected override void CreateChildControls()
              {
                  TasksVisualWebPartUserControl control = 
                    Page.LoadControl(_ascxPath) as TasksVisualWebPartUserControl;
                  if (control != null)
                  {
                      control.WebPart = this;
                  }
                  Controls.Add(control);
              }
      
              [Personalizable(), WebBrowsable, Category("Task WebPart Settings")]
              public string AssignedTo { get; set; }
      
              [Personalizable(),
              WebBrowsable, 
              DefaultValue("Tasks"), 
              Category("Task WebPart Settings")]
              public string ListName { get; set; }
      
          }
      }
      
      This code does the following:
      1. A private member, _ascxPath, is declared and is then initialized with the path of the web user control.
      2. In the CreateChildControls method, the web user control is loaded by using Page.LoadControl method. The loaded control is added to the control collection.
      The Web user control does not have an option to define the custom properties. You have to create properties inside the Web Part and make these properties available to the user control. Create two custom properties for the Web Part named AssignedTo and ListName.
    • TasksVisualWebPartUserControl.ascx    Contains the following code.
      XML
      <%@ Assembly Name="$SharePoint.Project.AssemblyFullName$" %>
      <%@ Assembly Name="Microsoft.Web.CommandUI, Version=14.0.0.0, Culture=neutral, 
          PublicKeyToken=71e9bce111e9429c" %> 
      <%@ Register Tagprefix="SharePoint" Namespace="Microsoft.SharePoint.WebControls" 
          Assembly="Microsoft.SharePoint, Version=14.0.0.0, Culture=neutral, 
          PublicKeyToken=71e9bce111e9429c" %> 
      <%@ Register Tagprefix="Utilities" Namespace="Microsoft.SharePoint.Utilities" 
          Assembly="Microsoft.SharePoint, Version=14.0.0.0, Culture=neutral, 
          PublicKeyToken=71e9bce111e9429c" %>
      <%@ Register Tagprefix="asp" Namespace="System.Web.UI" Assembly="System.Web.Extensions, 
          Version=3.5.0.0, Culture=neutral, PublicKeyToken=31bf3856ad364e35" %>
      <%@ Import Namespace="Microsoft.SharePoint" %> 
      <%@ Register Tagprefix="WebPartPages" Namespace="Microsoft.SharePoint.WebPartPages" 
          Assembly="Microsoft.SharePoint, Version=14.0.0.0, Culture=neutral, PublicKeyToken=71e9bce111e9429c" %>
      <%@ Control Language="C#" AutoEventWireup="true" CodeBehind="TasksVisualWebPartUserControl.ascx.cs" 
          Inherits="SPVisualWebParts.TasksVisualWebPart.TasksVisualWebPartUserControl" %>
      
      <asp:GridView ID="GridViewTasks" runat="server" AutoGenerateColumns="False" 
          BackColor="#DEBA84" BorderColor="#DEBA84" BorderStyle="None" BorderWidth="1px" 
          CellPadding="3" CellSpacing="2" EnableModelValidation="True">
          <Columns>
              <asp:HyperLinkField DataTextField="Title" HeaderText="Title" 
                  DatahrefFields="href" />
              <asp:BoundField DataField="AssignedTo" HeaderText="Assigned To" />
              <asp:BoundField DataField="Description" HeaderText="Description" />
              <asp:BoundField DataField="Status" HeaderText="Status" />
              <asp:BoundField DataField="Priority" HeaderText="Priority" />
              <asp:BoundField DataField="StartDate" DataFormatString="{0:MMMM d, yyyy}" 
                  HeaderText="Start Date" />
              <asp:BoundField DataField="DueDate" HeaderText="Due Date" 
                  DataFormatString="{0:MMMM d, yyyy}" />
          </Columns>
          <FooterStyle BackColor="#F7DFB5" ForeColor="#8C4510" />
          <HeaderStyle BackColor="#A55129" Font-Bold="True" ForeColor="White" />
          <PagerStyle ForeColor="#8C4510" HorizontalAlign="Center" />
          <RowStyle BackColor="#FFF7E7" ForeColor="#8C4510" />
          <SelectedRowStyle BackColor="#738A9C" Font-Bold="True" ForeColor="White" />
      </asp:GridView>
      
  2. Drag the grid view control from the Toolbox to the Visual Studio designer, as shown in Figure 16.
    Figure 16. Drag the grid view control to the design surface
    Drag the grid view control to the design surface
    For a code-only Web Part, you create the entire grid view and its styles and columns through .NET Framework coding by using the CreateChildControls method. But in the Visual Web Part, you design it by using the Visual Studio designer.
    The following code snippet shows the code-behind for the web user control (TasksVisualWebPartUserControl.ascx.cs).
    C#
    using System;
    using System.Web.UI;
    using System.Web.UI.WebControls;
    using System.Web.UI.WebControls.WebParts;
    using Microsoft.SharePoint;
    using System.Collections.Generic;
    using System.Text;
    
    namespace SPVisualWebParts.TasksVisualWebPart
    {
        /// <summary>
        /// Code-behind file for the web user control.
        /// </summary>
        public partial class TasksVisualWebPartUserControl : UserControl
        {
            /// <summary>
            /// The web user control code-behind cannot access the Web Part 
            /// custom properties directly. So, TasksVisualWebPart is declared
            /// and the instance is assigned in CreateChildControls() of 
            /// the TasksVisualWebPart.cs file. The web user control can 
            /// access custom properties by using this property.
            /// 
            /// </summary>
            public TasksVisualWebPart WebPart { get; set; }
    
            /// <summary>
            /// If you don't have any dependency on the custom properties in the 
            /// Page_Load() event, you can bind the data to the grid view inside 
            /// this event.
            /// </summary>
            /// <param name="sender"></param>
            /// <param name="e"></param>
            protected void Page_Load(object sender, EventArgs e)
            {
    
            }
    
            /// <summary>
            /// In the code-only Web Part, you can bind the data to the grid 
            /// view in the OnLoad event or OnPreRender event. In the web user 
            /// control code-behind, you cannot bind the data in Page_Load 
            /// method. Whenever the following code is executed--
            /// 
            ///  TasksVisualWebPartUserControl control = Page.LoadControl(_ascxPath) 
            ///     as TasksVisualWebPartUserControl;
            ///  Controls.Add(control);
    
            ///
            /// --it automatically starts the life cycle of user control. It then calls 
            /// Page_Load() method before executing the below code. The following code 
            /// sets the TasksVisualWebPart Web Part instance to web user control
            /// Web Part property.
            /// 
            ///     if (control != null)
            ///     {
            ///          control.WebPart = this;
            ///     }
            /// 
            /// </summary>
            /// <param name="e"></param>
            protected override void OnPreRender(EventArgs e)
            {
                base.OnPreRender(e);
    
                SPWeb web = SPContext.Current.Web;
                SPList list = default(SPList);
    
                if (this.WebPart != null && 
                    this.WebPart.ListName != null && 
                    this.WebPart.ListName.Length > 0)
                {
                    list = web.Lists.TryGetList(this.WebPart.ListName);
                }
                else
                {
                    list = web.Lists.TryGetList("Tasks");
                }
    
                this.GridViewTasks.DataSource = this.GetTasksEntity(list);
                this.GridViewTasks.DataBind();
            }
    
            /// <summary>
            /// Get the TaskEntity entity.
            /// </summary>
            /// <param name="list"></param>
            /// <returns></returns>
            private List<TaskEntity> GetTasksEntity(SPList list)
            {
                List<TaskEntity> tasks = new List<TaskEntity>();
    
                StringBuilder sb = new StringBuilder();
                sb.Append("<Where>");
                sb.Append("     <Eq>");
                sb.Append("        <FieldRef Name='AssignedTo' />");
    
                if (this.WebPart != null && 
                    this.WebPart.AssignedTo != null && 
                    this.WebPart.AssignedTo.Length > 0)
                {
                    sb.Append(string.Format("        <Value Type='User'>{0}</Value>", 
                        this.WebPart.AssignedTo));
                }
                else
                {
                    sb.Append(string.Format("        <Value Type='User'>{0}</Value>", 
                        SPContext.Current.Web.CurrentUser.Name));
                }
    
                sb.Append("     </Eq>");
                sb.Append("</Where>");
    
                SPQuery query = new SPQuery();
                query.Query = sb.ToString();
    
                SPListItemCollection items = list.GetItems(query);
    
                if (list != null && list.Items.Count > 0)
                {
                    foreach (SPListItem item in items)
                    {
                        TaskEntity task = new TaskEntity();
    
                        task.Title = this.GetFieldValue(item, "Title");
                        task.href = string.Concat(
                            list.DefaultDisplayFormUrl, 
                            string.Format("?ID={0}", item.ID));
                        task.Description = this.GetFieldValue(item,"Description");
                        task.AssignedTo = this.GetFieldValue(item,"AssignedTo");
                        task.Status = this.GetFieldValue(item,"Status");
                        task.Priority =  this.GetFieldValue(item,"Priority");
                        task.StartDate = DateTime.Parse(item["StartDate"].ToString());
                        task.DueDate = DateTime.Parse(item["DueDate"].ToString());
    
                        tasks.Add(task);
                    }
    
                }
    
                return tasks;
            }
    
            private string GetFieldValue(SPListItem item, string fieldName)
            {
                string strFieldValue = string.Empty;
    
                if (item != null && item.Fields.ContainsField(fieldName) && item[fieldName] != null)
                {
                    strFieldValue = item[fieldName].ToString();
                }
    
                return strFieldValue;
            }        
        }
    
        /// <summary>
        /// Task entity for the Tasks list.
        /// </summary>
        public class TaskEntity
        {
            private string assignedTo;
    
            public string Title { get; set; }
            public string AssignedTo
            {
                get
                {
                    if (assignedTo.Length > 0)
                    {
                        string[] user =
                            assignedTo.Split(
                            SPFieldMultiChoiceValue.Delimiter.ToCharArray());
                        return user[user.Length - 1];
                    }
    
                    return string.Empty;
                }
                set { assignedTo = value; }
            }
            public string Description { get; set; }
            public string Status { get; set; }
            public string Priority { get; set; }
            public DateTime StartDate { get; set; }
            public DateTime DueDate { get; set; }
            public string href { get; set; }
    
        }
    }
    
    In this code, the first statement inside the TasksVisualWebPartUserControl class declares a member of type TasksVisualWebPart that points to the instance of a Web Part that loads this user control. Because the web user control cannot access the custom properties of Web Part directly, it uses this member to access all of the custom properties that are defined for the Web Part.
    In the case of the code-only Web Part, you can bind the data in OnLoad method as shown in the earlier example. You can do so because you can access custom properties inside the Web Part, and you can block the thread to wait until the CreateChildControls method finishes by using EnsureChildControls. However, the Visual Web Part is different when compared to the code-only Web Part: You can access custom properties by using the property (TasksVisualWebPart WebPart) that you declared in the previous step. In the Page_Load event of the web user control, the custom properties have null values because the life cycle of the web user control begins when the ASCX control is loaded in the CreateChildControls method.
    In the code, the data binding logic is placed in the OnPreRender event to access the custom properties such as AssignedTo and ListName. The values, if specified in the custom properties, are used; otherwise the default values defined in the code are used. Either way, the list items are retrieved by using the SPQuery object in a CAML query.
  3. To deploy the solution, right-click the project name in Solution Explorer and then click Deploy. Visual Studio 2010 builds the solution package and deploys the solution (see Figure 17).
    Figure 17. Deploy the solution
    Deploy the solution
  4. Next, edit the SharePoint page and add the Web Part to the page. Figure 18 shows the output.
    Figure 18. Two Web Parts after being added to the page
    Two Web Parts after being added to the page
    You can also change the custom properties