Sunday, May 19, 2019

Save site as a template in SharePoint 2013/2016/Online

What are SharePoint Site Templates?

A site template is like a blueprint for the site. SharePoint site templates are prebuilt definitions designed around a particular business need. There are default site templates like Team Site, Project Site, and Communities Site, publishing site etc. but you can also create your own site template based on a site you’ve created and customized.
You can customize a SharePoint site like, add libraries, lists, views, workflows, logos, and other elements that you require for your business, then Save the Site as a template and reuse the site template to create different sites. Custom site templates are often used to deploy solutions in other sites or to provide site consistency within your organization. You can also package the site into a Web Solution Package file (.wsp) and open it in another environment or application such as Visual Studio and further customize it there.
When you save a SharePoint site as a template, you’re saving the overall framework of the site, its lists and libraries, views and forms, and workflows. In addition to these components, you can also include the contents of the site in the template; for example, the documents stored in the document libraries or data in the lists in SharePoint.

What is Supported in SharePoint 2013 save site as template?

Below are the things which are supported when you Save SharePoint 2013/Online site as a template.
Lists, libraries, external lists, data source connections, list views and data views, custom forms, workflows, content types, custom actions, navigation, site pages, master pages, modules, and web templates.

What is Unsupported in SharePoint 2013 save site as template?

Below are the things which are unsupported when you Save SharePoint 2013/Online site as a template. These things will not come along with the template.
Customized permissions, running workflow instances, list item version history, workflow tasks associated with running workflows, people or group field values, taxonomy field values, publishing sites and pages, and stapled features.

How save site as template works in SharePoint online/2013/2016?

When you create a site template, information about site features and content types is also saved. When you use the site template in a different site collection, those features must be available and activated for the site template to work.
The size of the template should not beyond 50 MB site template limit.
When you Save a list as a template it will save as a .wsp file will store it in the site collection’s Solution Gallery. After it saved it can be used to create subsites within that same site collection. If you want to use the site template to create sites in a different site collection, you can browse to the Solution Gallery and download the solution. You can then upload the solution in a different site to make the site template available there.
The Save Site As Template functionality uses the web template technique behind the scenes. It generates an ONET.xml file and an elements.xml file containing a WebTemplateelement. When a site is saved as a template, SharePoint has to make sure that everything that was available in the original site is also available in a new site that is created by using the site template. To ensure this, SharePoint packages all the features, site columns, content types, property bag values, and much more from the original site into the site template.
They can only be used on sites that don’t have the publishing features enabled. Activating the publishing features on a site will make the Save Site As Template link disappears from the site settings page. But you can access it from URL which is not recommended form Microsoft. This can sometimes cause major issues.

Save site as template in SharePoint 2013/2016/Online

There is no difference between creating a Site template in SharePoint 2013, SharePoint 2016 and SharePoint Online. To create a site template, open your SharePoint 2016/2013 site, click on the gear icon and then click on Site settings like below:
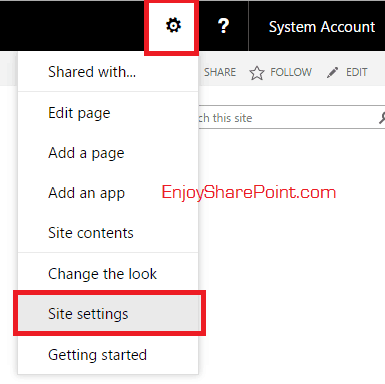
sharepoint 2013 save site as template
SharePoint 2013/2016 save site as template
In the Site Settings page click on “Save site as template” which is under the Site Actions section.
Save Site As Template SharePoint 2013
Then it will open the Save as Template page, Give a file nametemplate namedescription as well as if you want to include the content, check the checkbox “include content” as shown in the fig below:
Save site as template in SharePoint 2013
Once the operation completed successfully, it will display a successful message. The template will be saved in the solution gallery of the site collection.
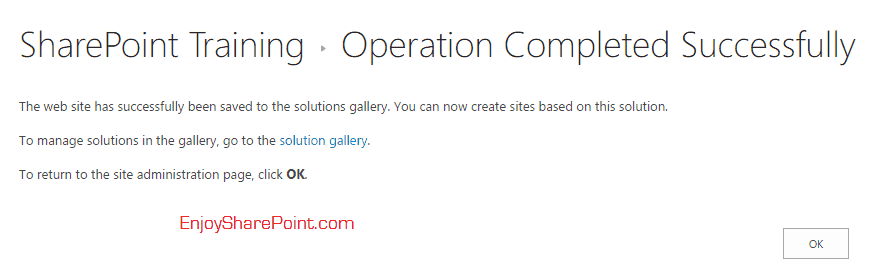
save site as template sharepoint online
save site as template SharePoint online
Now if you will visit the solution gallery you can see the template must be saved and activated there. It will display like below: (To visit the solution gallery from the site settings page click on Solutions which is under Web Designer Galleries)
how to Save Site As Template in SharePoint 2013/2016

Create Sub Site using SharePoint Custom Site Template

Once we save the SharePoint site as a template, we can create a site or subsite using the custom SharePoint template.
Now if you will go to the Site Contents page of SharePoint 2013/2016/Online site and try to create a new subsite you can see the template appears under the Custom tab.
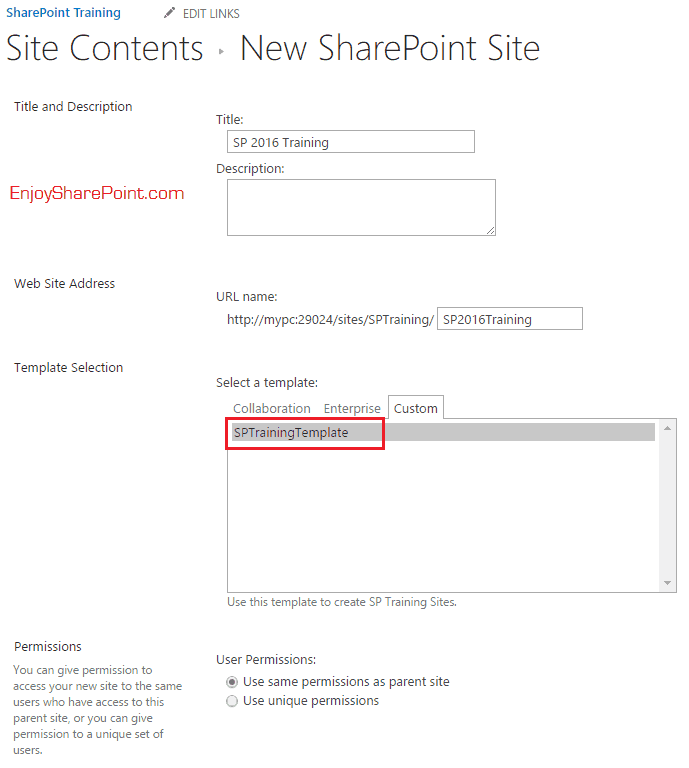
steps to Save Site As Template in SharePoint 2016
Once you create the site using the template, the new site will be created based on the same template. As you can see in the example, the new site has the logo which was there in the template as well as one Employee list is also there which was there in the existing template. The new site looks like below:
save site as template sharepoint 2016
save site as template SharePoint 2016

Upload Site Template to Other Site Collection in SharePoint 2013/2016/Online

As we have discussed the site template will be available to that SharePoint site collection only. If you will check in any other site collection then the template will not available. Here it is how looks in another site collection.
Save Site As Template in SharePoint 2016
So first go to the source site collection and then from site settings page click on Solutions to open the Solution Gallery. There click on the solution file which will ask you to Save the file in local drive. Save the file.
Now come back to the SharePoint site collection where you want to upload the solution, your destination site collection. Click on the gear icon and then Site Settings link. In the Site Settings page click on Solutions which is under “Web Designer Galleries“.
In the Solution Gallery, click on the Upload Solution button to upload the solution which we have saved in our local drive.
Save site as template in SharePoint 2013
save site as template sharepoint online
save site as template SharePoint online
Then browse the file and click on OK. It will add the solution and it will ask you to activate the solution. Click on the Activate button to activate the solution like below:
sharepoint 2013 save site as template
Once it is activated in the Solution Gallery like below the template will be available in the site collection to use.
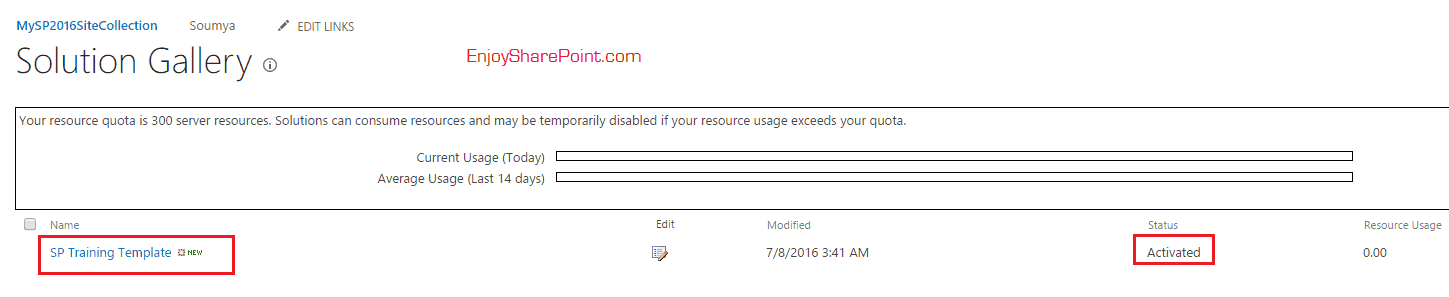
save site as template sharepoint online
Now go to Site Contents page and try to create a new subsite, in the templates you can see the site template will appear like below:
Save Site As Template in SharePoint 2013/2016/Online

SharePoint 2013 save site as template url

We can also directly access the SharePoint 2013 save site template url. Suppose you are trying to Save site as a template in SharePoint 2013/2016/Online, then you will not see the “Save site as template” option in SharePoint site settings page. But you can directly access SharePoint 2013 save site as template url:
<You SharePoint Site URL>/_layouts/savetmpl.aspx
or
<You SharePoint Site URL>/_layouts/15/savetmpl.aspx
You may like following SharePoint customization tutorials:

Site definition vs Site template in SharePoint 2013/2010

Site definition vs site template in SharePoint 2013/2010

A site definition defines a unique SharePoint site. Site definition is a combination of multiple files like .xml, .aspx, .ascx, and .master page, .gif , .doc etc and are stored in C:\ProgramFiles\Common Files\Microsoft Shared\web server extensions\14\TEMPLATE\SiteTemplates directory.
But Site Templates are created from an existing site and are stored in the Content database in the Sandboxed Solution gallery.
According to MSDN, Here are some advantages and disadvantages of Site Definition and Site template.

Advantages of Site Definitions in SharePoint 2013/2010

Below are few advantages of site definitions in SharePoint 2013/2010.
  • Data is stored directly on the Web servers, so performance is typically better.
  • A higher level of list customization is possible through direct editing of a SCHEMA.XML file.
  • Certain kinds of customization to sites or lists require the use of site definitions, such as introducing new file types, defining view styles, or modifying the drop-down Edit menu.

Disadvantages of Site Definitions in SharePoint 2013/2010

Below are a few disadvantages of site definitions in SharePoint 2013/2010.
  • Customization of site definition requires more effort than creating custom templates.
  • It is difficult to edit a site definition after it has been deployed.
  • Doing anything other than adding code can break existing sites.
  • Users cannot apply a SharePoint theme through a site definition.
  • Users cannot create two lists of the same type with different default content.
  • Customizing site definitions requires access to the file system of the front-end Web server.

Advantages of Site Templates in SharePoint 2013/2010

Below are few advantages of site templates in SharePoint 2013/2010.
  • Custom templates are easy to create.
  • Almost anything that can be done in the user interface can be preserved in the template.
  • Custom templates can be modified without affecting existing sites that have been created from the templates.
  • Custom templates are easy to deploy.

Disadvantages of Site Template in SharePoint 2013/2010

Below are few disadvantages of site templates in SharePoint 2013/2010.
  • Custom templates are not created in a development environment.
  • They are less efficient in large-scale environments.
  • If the site definition on which the custom template is based does not exist on the front-end server or servers, the custom template will not work.
Another difference is Feature Stapling is supported by Site Definitions but it is not supported by Site Template.
You may like following SharePoint tutorials:
Hope this SharePoint 2013 tutorial explains the difference between site definition vs site templSharePointrepoint 2013/2010.

Site Templates vs Site Definition vs Web Templates vs Remote Provisioning


Site Definitions
Site Templates
Files are on disk, better performance.

Files are in database, less efficient.

Highly customizable and extensible (XML  and .NET code is much more flexible than UI)

Not easily extensible  (You are limited by what UI offers)

Can provision multiple webs *

Can only provision one web

Complex to create

Easier to create

Requires admin access to server for deploying.

Installable from a Web UI by site owners.

Modifying the site definition after provisioning at least one site from it is not supported and might break existing sites.

Custom templates can be modified without affecting existing sites that have been created from the templates(**).

Site templates are the one’s which are created by using the “Save site as template” functionality from the site settings.Saving sites as template is not supported for publishing sites.Site templates are only available in the Site scope, meaning that you can’t directly create new site collections based on site template

Web templates is technique based on WebTemplate feature framework element, which was introduced in SharePoint 2010. Technique provides us a way to use alternative onet.xml during provisioning time of the sites without any dependencies on that onet.xml file when provisioning has been completed.
We need to create two files for each of the web templates. Other one is empty element (is VS2010 is used) for defining the actual WebTemplate element and other one is completely similar onet.xml file as for site definitions. WebTemplate element is supported in two scopes, which are Farm and Site
One big advantage of the web templates is the fact that since they are feature based and there won’t be any files stored in file system, those are completely supported usually by the cloud services, like MS Online (BPOS). One really important advantage with the web templates compared to the site templates is the fact that we can utilize the publishing features in web templates.

Site definitions are the classic xml files, which are for example used to provision out of the box sites. Many of the developers learned to create these in 2007 version, since they are very powerful and there were almost no other options available for introducing new options for the Create site functionality. As mentioned earlier site definition consists basically from two different files: WebTemp*.xml and onet.xml files.WebTemp*.xml defines how the site definition is visible for the end users and the onet.xml file contains the definitions for the actual site provisioning.One of the key downside is also the fact that site definitions will require full trust or farm solutions, which means that they are only supported in on-premises deployment 

Remote provisioning is model where we actually do the template system outside of the SharePoint by using the new SharePoint app patterns. In this case we would be using provider hosted pattern to provide customizable sub site creation experience for the end users of the SharePoint.This model is suitable for both on-premises and Office365, which is clearly beneficial from long term maintenance and operation perspective
Custom Site Provisioning Provider to the Rescue!!!!
A site provisioning provider is a piece of code that is run by a site definition when a new site is created. By default SharePoint performs the provisioning actions of a new site. These actions can include creation of lists, activation of features etc. and, most importantly, telling the site which site definition it should be based off. This is important because by declaring the site definition to base the site off you inevitably bind the site to that site definition.
Now that you understand what a site provisioning provider does its time to explain how we can use this concept to our advantage. Generally we would like to use a site template to do most things – they are simple to create and just as easy to deploy. Site templates also provide us with a way to easily deploy a new custom site to a completely different SharePoint installation, provided they are based on an out-of-the-box site definition.
With the above facts in mind, by creating a site definition declaration with a custom provisioning provider, we can tell the SharePoint very specifically how to create the site. This includes which site definition we should base the site off. It is very important to note that there is actually a separation between the declaration of a site definition and the onet.xml which declares all the parts of the site definition. The reason this is so important is that by use of the site provisioning provider we can intercept the call to use the onet.xml. Its through this interception that we can then request the site provisioning provider to instead use a different site definition/onet.xml – specifically an out-of-the-box site definition/onet.xml. This means that we are, in a very round-a-bout way creating something very similar to a site template but from code. Recall I said I liked to think of a site template as an XML script, well now instead of having an XML script to build the site we can create code to build the site.
After the above paragraph you’re probably sitting there confused with the question “but if my site definition is being called how is it that I end up with a site set up like a template?” and that is a fair question. As I described above, its important to realise that there is a difference between your declaration of the site definition and the actual files that describe your site definition. By using the site provisioning provider we no longer need the file (onet.xml) that describes your site definition as we instead use the one provided by one of the out-of-the-box site definitions. Its similar to using a map to find your way to a place but along your journey there are road works and signs for a detour. Even though the map tells you to go one way, you end up following the detour signs. The site provisioning provider is the detour sign.
By basing the new site off an out-of-the-box site definition as opposed to a custom site definition we have effectively decoupled ourselves as a dependency for any future site templates that may be based off us. Additionally we can add to the code and we won’t break any sites that have already been created from using the site provisioning provider. As you can see, in effect, we’ve turned the standard site definition into a sort of site definition/site template hybrid. It uses the same concept of a site template but built within the framework of a site definition.

allowunsafeupdates vs runwithelevatedprivileges

AllowUnsafeUpdates vs SPSecurity.RunWithElevatedPrivileges

The Microsoft idea behind introducing the AllowUnsafeUpdates property is to protect you from cross-site scricpting attacks. The way this works is that if your application is running in an HTTPContext (i.e. it’s a web part for instance) and the request is a GET request then SharePoint will refuse to do any changes unless the value of AllowUnsafeUpdates is set to true and by default it will be false for GET requests. If you try to do any updates to lists, webs or any SharePoint objects that require an SPSite to be created first, and if you don't set AllowUnsafeUpdates to true you will get this exception:

System.Exception: Microsoft.SharePoint.SPException: The security validation for this page is invalid. Click Back in your Web browser, refresh the page, and try your operation again. —>System.Runtime.InteropServices.COMException (0x8102006D): The security validation for this page is invalid. Click Back in your Web browser, refresh the page, and try your operation again.

It is important to understand that if you are writing a class library for example, your code will behave differently when called from a web application and when called from a rich client. Actually if the HTTPContext.Current is null then AllowSafeUpdates will be always true. This is the case in rich clients where no cross-scripting is possible as there are simply no web requests.

Usually when you create your own SPSite or SPWeb objects, i.e. when you are not getting them from the SPContext, and when you try to update anything such as web or list properties, list items metadata etc, you may get the exception listed above. This is a clear indication that AllowUnsafeUpdates of the SPWeb is false and this is preventing you from doing the update. This problem is resolved easily by setting the AllowUnsafeUpdates of the parent web object to true. Still sometimes even after you have done this you may still be getting the same error.  This is typically caused by one of the the following reasons:

A) You have set the AllowUnsafeUpdateto true for the wrong SPWeb
You have to be careful because sometimes the ParentWeb of an object is not the same instance of the web you have retrieved the object from. For example when you go initialWeb.Lists[listId] you would expect that the returned list’s ParentWeb instance is the same as you initialWeb. However this is not the case. So if somewhere later in your code you go list.ParentWeb.UpdateSomething() this will not work because you have never set the AllowUnsafeUpdates property of list.ParentWeb. You have set it for your initialWebbut even that this is the same web as the list’s parent web both are different instances. Usually you see the error and then you go and investigate in Reflector whether this is the same instance or not. Alternatively you could use another more generic and clever way to deal with almost any similar situation described in the following post:
http://community.bamboosolutions.com/blogs/bambooteamblog/archive/2008/05/15/when-allowunsafeupdates-doesn-t-work.aspx

The author suggests that you can set the HttpContent.Currentto null before you do your updates and then reassign its initial preserved value when done. This will work great but remember to set the HTTPContent to null as early as possible. In the post above probably SharePoint uses the site.RootWebto do the updates to the site scoped features and the RootWeb’sAllowUnsafeUpdateshasn’t been set to true explicitly.

B) The AllowUnsafeUpdates gets reset to false sometimes after you have set it to true
If we have a look at how the property is managed it turns out that it is stored in the request object associated with every SPWeb (which is actually a COM object)


PList list= web.Lists["MyList"];
SPListItemCollection items= list.GetItems();
web.AllowUnsafeUpdates = true;
foreach (SPListItem item in items)
{
     item["Title"] = "New Title";
     item.Update();
}
web.AllowUnsafeUpdates = false;
This actually means that every time the request is reset, the property will be also reset to its default value. The m_Request member is modified when a new web is created, when the web is disposed or when the SPWeb.Invalidate() method is called.

So any operation that calls SPWeb.Invalidate() will reset AllowUnsafeUpdateto its default value. And for code running under HTTPContext, i.e. web applications, this default value for a GET request will be false. I’ve looked up for you all legitimate cases for which Invalidate() is being called by the SharePoint object model. These cases are:

1) When the Name or the ServerRelativeUrl properties of the SPWeb are changed and then Update() is called. In this case the AllowUnsafeUpdate is reset because with the change of these properties the URL of the web will change and logically the request object will change as it will now point to a different URL.

2) When any object that implements ISecurable(those are SPWeb, SPList and SPListItem) breaks or reverts their role definition inheritance. This means every time you call SPRoleDefinitionCollection.BreakInheritance()BreakRoleInheritance()ResetRoleInheritance() or set the value of HasUniquePerm the AllowUnsafeUpdatesproperty of the parent web will reset to its default value and you may need to set it back to true in order to do further updates to the same objects.

3) In many cases when an exception is caught by the SharePoint object model when you try to retrieve any sort of data the AllowUnsafeUpdatesof the parent web will be reset to false as a precaution to protect against potential exploits. In those cases however the objects will be in unknown state anyway after the request has been reset and the exception is re-thrown so they are of no practical interest.
And finally it is also good to mention that you may get another related exception when trying to update your SharePoint objects and that is:

System.Exception: Microsoft.SharePoint.SPException: Cannot complete this action.Please try again. —>System.Runtime.InteropServices.COMException (0×80004005): Cannot complete this action.

This usually happens when some updates have been made to an object (usually SPSite, SPWeb or SPList) that may be clashing with your changes and SharePoint refuses to do the update. To recover from this situation you simply need to create fresh copies of the SPSite and the SPWeb objects and do the updates on the objects retrieved from the fresh copies. And of course don't forget to set the AllowUnsafeUpdatesto true for the freshly created SPWeb if required.

The SPSecurity.RunWithElevatedPrivileges method enables you to supply a delegate that runs a subset of code in the context of an account with higher privileges than the current user.
A standard use of RunWithElevatedPrivileges is:


SPSecurity.RunWithElevatedPrivileges(delegate()
{
    // Do things by assuming the permission of the "system account".
});

Frequently, to perform actions in SharePoint, you must get a newSPSite object to effect the changes.  For example:
SPSecurity.RunWithElevatedPrivileges(delegate()
{
    using (SPSite site = new SPSite(web.Site.ID))
    {
       // Do things by assuming the permission of the "system account".
    }
});
 

Although elevation of privilege provides a powerful technique for managing security, it should be used with care. You should not expose direct, uncontrolled mechanisms for people with low privileges to circumvent the permissions granted to them. 

Note: If the method passed to RunWithElevatedPrivileges includes any write operations, the call toRunWithElevatedPrivileges should be preceded by a call to either SPUtility.ValidateFormDigest() orSPWeb.ValidateFormDigest().

References: